
Size charts often fail for a surprisingly simple reason: the shopper and the seller are looking at different kinds of numbers. A body measurement describes the person. A garment measurement describes the finished item. Neither is automatically more useful. The right one depends on what the table is trying to tell you and how the garment is intended to fit.
Understanding this distinction makes size charts easier to use, makes product pages easier to write, and reduces the tendency to choose a size based only on a familiar S, M, L, or numeric label.
Photo: Kheel Center, Cornell University Library, CC BY 2.0, via Flickr.
Start by identifying what the numbers describe
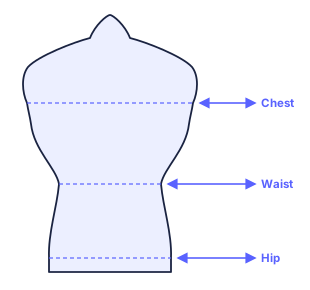
A body chart normally gives a recommended range for a person’s bust, waist, hip, neck, or foot length. The garment is made with a planned amount of room—often called ease—beyond those body measurements. A finished-garment chart instead gives the dimensions of the actual item, usually measured flat or around the circumference.
The labels should say which one is being shown. “Fits chest 38–40 in” is a body recommendation. “Chest width 22 in, measured flat” is a garment measurement. Treating a flat width as though it were a body circumference is one of the most common sizing mistakes. Before comparing, check whether the seller has already doubled the number and whether the item was measured with fabric relaxed or stretched.
How to use a garment you already own
For an online purchase, a favourite item from your wardrobe can be a better reference than a generic conversion table. Choose something that has the same job as the item you are considering: compare a relaxed shirt with a relaxed shirt, a high-rise trouser with another high-rise trouser, and a running shoe with a running shoe. A different silhouette will produce a misleading comparison.
Lay the reference garment on a flat surface without pulling it. Measure the points the new listing uses: underarm-to-underarm width, shoulder seam, body length, waist, hip, rise, thigh, inseam, or leg opening. Note the measurement method in your own record. A 20-inch chest width is usually a 40-inch circumference only if the garment lies flat and the listing uses the same convention.
This method has a practical advantage: it captures your preferred fit. Two people with the same body measurements may prefer very different amounts of room. One may like a close tee; another may deliberately buy an oversized fit. Comparing a successful garment preserves that preference.
Ease is not an error
Ease is the deliberate difference between a body and the garment around it. A fitted woven shirt needs enough room to breathe and move. A winter coat needs room for layers. A compression garment may be designed with negative ease, meaning that its relaxed dimension is smaller than the body it is intended to fit because the fabric stretches.
The amount of ease should be explained in plain language on a product page. Useful wording includes “designed to sit close to the body,” “intended for layering,” “oversized through the shoulder,” or “stretch fabric with a supportive fit.” These statements help a shopper interpret the chart; they do not replace it.
When deciding between sizes, use the least forgiving point. For a button-front shirt that is usually the chest or upper back. For trousers it may be the hip, thigh, or rise rather than the labelled waist. A hem can often be altered, but a seam that pulls across the fullest point usually signals the wrong size or cut.
A simple decision process
- Read the table heading and identify body versus garment measurements.
- Choose a similar successful item or measure your body with a soft tape.
- Compare the controlling measurement first: chest, hip, foot length, or whichever point is most fitted.
- Account for stretch, lining, socks, layers, and the silhouette shown in product photography.
- Check the exact item’s return or exchange conditions before removing tags or wearing it outside.
For footwear, use heel-to-toe length in centimetres as the starting point, then compare the exact model’s chart. Foot width, toe shape, socks, and an orthotic can change the final choice. For bras and shapewear, band, bust, fabric recovery, and intended support all matter. There is no one-size conversion rule that removes the need to read the product’s own information.
What merchants should publish
A merchant can make this process much easier by publishing: a clearly labelled body chart, finished-garment measurements where useful, a short explanation of the measurement method, fabric/stretch information, and an image showing where the tape was placed. The chart should be attached to the exact product or product family—not hidden behind an unrelated general chart.
Avoid promising that a size “will fit everyone” or relying on an age, height, or country conversion alone. Size labels vary. The value of a good chart is that it lets the shopper make an informed comparison before buying.
For a worked footwear example, see the Nike foot measurement guide and the New Balance size and width guide. They are official references for their products; use the current product page whenever it differs from a general chart.
The best outcome is not a clever size recommendation. It is a shopper who understands what was measured, how the garment is intended to fit, and what information to check before committing to a purchase.
Worked example: comparing a favourite T-shirt
Imagine that a favourite relaxed T-shirt measures 54 cm from underarm to underarm when laid flat. Its chest circumference is approximately 108 cm when the front and back are measured in the same relaxed state. A new product page lists a “chest” of 56 cm, measured flat. Those are comparable garment measurements: the new shirt is about 4 cm larger around the chest.
Now imagine that the new page instead says “fits chest 108–112 cm.” That is a body recommendation, not a finished-garment measurement. It may still produce a shirt wider than 108 cm because the maker has included ease. The two listings can both be correct, but they should not be compared as identical numbers.
Use this quick check before deciding:
- Same object? Confirm that both numbers describe the body or both describe the finished garment.
- Same method? Check flat versus circumference, relaxed versus stretched, and the exact measurement point.
- Same silhouette? Compare a relaxed tee with a relaxed tee, not with a fitted base layer.
- Same controlling point? A shirt may be governed by chest, while trousers may be governed by hip or thigh.
For a product-page review process, use our size chart QA checklist. For category-level references, start with size charts by category.